Showing posts with label CRM 2011. Show all posts

Friday, March 27, 2015

Get local DateTime from UTC DateTime in CRM

Hello All,
Few days back I was writing a CRM 2013 plugin for an integration project in CRM. Requirement involved passage of some DateTime fields from CRM to another system. The other system was expecting the local date and time values for its DateTime fields in a string format. In my plugin code, I was pulling some DateTime fields from different entities using LINQ and OrganizationServiceContext. As we all know that CRM SDK web services always return the DateTime fields in UTC format only, I was retrieving it using LINQ (directly into the REST request object) converting the UTC date time into a string format (because the REST request object had string data type). Now since I have the string UTC DateTime value, I needed the same to be converted into the local time of the user under which the plugin is executed.

Below are the simple steps for converting any DateTime fields in CRM from UTC to user’s local time:
  1. Retrieve the “timezonecode” from user’s settings for the user under whose context the plugin is executed.
  2. Use the “timezonecode” as well as the UTC DateTime you want to convert to create LocalTimeFromUtcTimeRequest request.
  3. Pass the request object created in Step 3 above to “Execute” method of CRM Service.
  4. Response object of type LocalTimeFromUtcTimeResponse will contain the local time within its “LocalTime” property.

Okay! I hear you, enough of the stories and theories. Let’s dive directly inside the code below to perform the desired action above.

Below two functions will help you convert the UTC DateTime to Local DateTime. I have added code comments as much as I can to make it quite self-explanatory. Still if you need any help feel free to drop your comment below and I will try my best to address it.

In Order to perform vice-a-versa operation use UtcTimeFromLocalTimeRequest/UtcTimeFromLocalTimeResponse instead of LocalTimeFromUtcTimeRequest/LocalTimeFromUtcTimeResponse with some simple substitutions.

/// <summary>
/// Convert UTC DateTime to Local DateTime
/// </summary>
/// <param name="utcDateTime">DateTime in UTC Format</param>
/// <param name="service">CRM Organization Service</param>
/// <returns>Local DateTime</returns>
public DateTime ConvertUtcDateToLocal(DateTime utcDateTime, IOrganizationService service)
{
   // Get the TimezoneCode for the user
   int? _timeZoneCode = RetrieveCurrentUsersTimezone(_serviceProxy);

   // Some quick error checking
   if (_timeZoneCode != -1 && !_timeZoneCode.HasValue)
       throw new InvalidPluginExecutionException("Retrieve TimeZoneCode Failed!");

   // Below line is required only if you have a DateTime value as a String.
   // Uncomment below line if required
   //DateTime utcCreatedOnDate = DateTime.SpecifyKind(Convert.ToDateTime(stringUtcDateTime), DateTimeKind.Utc);

   // Create the LocalTimeFromUtcTimeRequest object using TimeZoneCode
   var request = new LocalTimeFromUtcTimeRequest
   {
       TimeZoneCode = _timeZoneCode.Value,
       UtcTime = utcDateTime
   };

   // Execute the above request created and get the Response back
   var responseLocalDateTime = (LocalTimeFromUtcTimeResponse)_serviceProxy.Execute(request);

   // Some null checking for the response object
   if (null != responseLocalDateTime)
       throw new InvalidPluginExecutionException("LocalTimeFromUtcTimeRequest Failed!");

   // Retrieve LocalTime from the Response
   DateTime localDateTimeValue = responseLocalDateTime.LocalTime;

   // Return Local DateTime value
   return localDateTimeValue;
}

/// <summary>
/// Retreive Current User's Timezonecode
/// </summary>
/// <param name="service">OrganizationService</param>
/// <returns>TimeZoneCode or -1</returns>
public int RetrieveCurrentUsersTimezone(IOrganizationService service)
{
   // Create RetrieveMultiple Request for UserSettings
   var currentUserSettings = service.RetrieveMultiple(
       new QueryExpression("usersettings")
       {
           ColumnSet = new ColumnSet("localeid", "timezonecode"),
           Criteria = new FilterExpression
           {
               Conditions =
{
new ConditionExpression("systemuserid", ConditionOperator.EqualUserId)
}
           }
       }).Entities[0].ToEntity<Entity>();

   // Some (old school) null and error checking
   if (null != currentUserSettings && currentUserSettings.Attributes.Contains("timezonecode"))
   {
       // Convert timezonecode into Integer type
       return Convert.ToInt32(currentUserSettings.Attributes["timezonecode"]);
   }
   else
       return -1;
}

Hope you find this post helpful. Feel free to post your comments/suggestions.

Thank You! ☺

Saturday, August 3, 2013

WID Installation Failed - ADFS Configuration on Windows Server 2012

Hi,

During the configuration of ADFS 2.1 on Windows Server 2012, I recently faced a very weird error which itself doesn't describes anything relevant about what the exact problem is.
Error reads something as below:
An error occurred during an attempt to perform the configuration task: WID Installation failed
Below are the screenshot of ADFS configuration wizard where the error was faced.


Looking to the Event Viewer for the error logs, I found the error message which says "The Windows component "Windows-Internal-Database" was successfully installed." but in fact the ADFS configuration wizard failed at the very same step throwing the contradictory error message as above.

Searched a lot behind the cause of this specific error occurring during ADFS configuration but all in vain and then suddenly I came across this link which had similar error but faced for Windows server 2008 with ADFS 2.0.

You can refer to the solution in the above link or refer to the same solution below for your ready reference.

Solution:

Solution is very simple unlike the error message. Windows Internal Database was already installed on the machine and that was the reason AD FS configuration failed. You will have to uninstall Windows Internal Database and then again start AD FS configuration during which it will again install WID by itself.

  • Go to Server Manager and at the right top menu bar panel, click on "Manage" -> "Remove Roles and Features"
  • In "Remove Roles and Feature" dialog box, go to "Features" menu and uncheck "Windows Internal Database" check box. (As shown in below screenshot)


  • Click on Next and complete the wizard.
  • Restart the server if it asks for after uninstall of WID.
  • Restart AD FS Configuration wizard and complete the configuration. It will work like a charm as it did for me in the below screenshot.


P.S.: If you face an error again during AD FS configuration at the same WID step then you might need to move all LDF and MDF files of WID database on the path C:\Windows\WID\Data to some different folder just as a backup practice and then restart AD FS configration again and hopefully this time it should work flawlessly. Once your AD FS configuration is completed successfully then if you want you can delete those existing LDF and MDF files. 

Hope you find this post helpful to solve some issues related to AD FS and WID. 

Kindly provide your valuable comments or suggestion regarding this post.

Thank You !!! J

Monday, July 29, 2013

Step By Step Guide – Installation of CRM 2011 on Windows Server 2012

Hello,

It’s been really a long period I have updated my blog for CRM. In this post we will go through the Step by Step procedure I used to successfully Install CRM 2011 over Windows Server 2012 with SQL Server 2012 installed.

With Update Rollup 13 released by Microsoft, CRM 2011 is now officially supported for Windows Server 2012 with AD FS 2.1. To install UR 13 on Windows Server 2012, it is mandatory to install Self-Healing Setup (SHS) which was released in April this year.

During the installation wizard of CRM 2011 on Windows server 2012, if the server has Active Internet connection then Self-Healing Setup will be downloaded by itself as a part of Windows Update but sometimes it fails to do so and creates problem during the further installation so there is a manual way to point the installation wizard to the SHS setup and we will go through the manual steps. If anyone faces such issues select the manual steps for installation of CRM 2011. I got much help on the manual step of installation from this Blog as well as this Microsoft support link which I am referring again below as a ready reference.

This will be a Single server deployment with AD DS, AD FS, CRM and SQL Server 2012 with SSRS all installed on single server. Although as per the Implementation Guide, Microsoft does not recommends installing CRM 2011 on Domain controller machine unless it is running Windows Small Business Server 2008.

Prerequisites: Below mentioned setups and server roles should be installed prior to start with CRM 2011 Installation
  • Active Directory Domain Services.
  • SQL Server 2012 with Full text search feature.
  • SQL Server Reporting Services installed and configured. (Test Report Server URL and Report Manager URL successfully using browser)
  • Internet Information Services (IIS).
  • Active Directory Federation Services 2.1 (It is good as a pre-requisite but you can install and configure this after CRM 2011 installation as well).
So without waiting much on this lets start the installation of CRM 2011 on Windows Server 2012.

Step 1: Download below setups and place them under a common folder. Let us take D:\CRMInstall as an example for this article.
  1. CRM 2011 Setup from Microsoft Download Site here and place it under D:\CRMInstall 
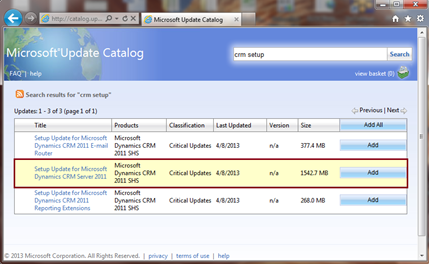
  2. Download Self-Healing Setup (SHS) from Microsoft update Catalog here (This link will work on Internet Explorer Only). Click on “Add” button and click on the “View Basket” link. Download the setup in the basket and place it under D:\CRMInstall\SHS (We will create a new sub folder here for the extraction of the setup). Extract the cab file as per your language code. Here we will use English (1033) and copy the extracted .msp package file at D:\CRMInstall.
  3. For CRM 2011 Setup to use the downloaded SHS update package instead of online downloading, we will need to create a config file. You can find detailed information about the same here. We will use a simple XML file to point out setup to use the downloaded SHS installer.
    Create an XML extension file (config.xml) with below XML code in it. Place the config file at D:\CRMInstall location. (Please make sure to change the path if you have kept the .msp at different location)

  4. Download Update Rollup 13 for Server as well as SSRS Connector from here and place it under folder D:\CRMInstall\UR13 (Sub-Folder).
After Step 1, you will be having 3 files CRM 2011 Setup, SHS Update Package installer and config.xml file together at D:\CRMInstall

Step 2: To start CRM 2011 Installation, double click the CRM 2011 Setup and extract all the required installation files to D:\CRMInstall\Setup (Sub-Folder for CRM Setup Files).

For pointing CRM installer to use the downloaded SHS setup and prevent it to download it online, we need to run the CRM Setup through command prompt.
  1. Open Command Prompt with Administrator privileges and traverse to CRM Setup path (here: D:\CRMInstall\Setup)
  2. Enter below command and hit Enter to start the setup.

Using above command, it will launch CRM 2011 Setup Wizard as below.

Step 3: Walk through CRM 2011 Setup Wizard.
  1. First screen of the setup wizard will be as below which means the setup will use the downloaded SHS setup installer and will not download it from internet. Click Next.

  2. Enter the CRM Product Key. Click Next.

  3. Check the “I accept this license agreement” checkbox. Click I Accept.

  4. If you don’t have the required components already installed then Setup will download it and install them. Click on Install button and after installation Click Next. (If you already have them installed this step will be skipped).

  5. Select the Installation Directory. Click Next.

  6. Select “Create a new deployment” radio button and select the SQL Server 2012 instance, from the drop down box, on which you want to keep your CRM Database. Click next.

  7. Select the AD Organizational Unit of your AD tree. AD OU must be same domain as the installation CRM Server is in.

  8. Specify the service Accounts for each of the service. Since this is a Single server deployment, we will just use NETWORK SERVICES account for all four services. However if you have multi-server environment then it is advised to you separate service accounts for each of the services. Kindly refer CRM 2011 Implementation Guide here for details.

  9. Select the Website that will be created in IIS for MS CRM 2011. If you are planning for IFD, I will recommend you to create a new web site on a different port other than “Default Web Site”. The reason behind this is that IFD needs AD FS and AD FS will be installed by default on “Default Web Site” and will use default HTTPS port 443.

  10. Enter the Email router server name and Click Next. (You can even keep it blank and move ahead if you are planning to install Email Router later). Click Next.

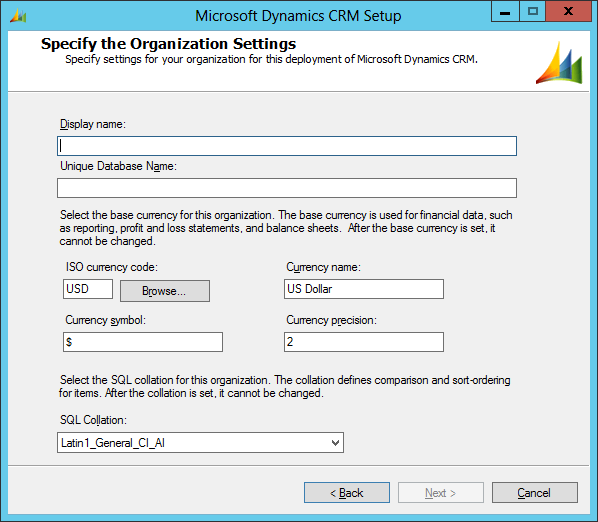
  11. Enter Display Name for the Organization Name and Unique Database Name (will be automatically populate from Display Name appending “_MSCRM”). Select the default Currency name, code, symbol and precision for your deployment. Remember this will be used as the base currency for your organization. Click Next.

  12. Enter the Report server URL. Click Next.

  13. System check will verify all the components. If you have any error in this, you will have to resolve it before moving ahead.
    Click next if all the steps are successful without any Error.

  14. CRM Installation will be started and you will see the Setup Complete screen as below. Click on Finish to start the installation of SSRS connector for CRM 2011. (If you unchecked the check box then you can install it later from the installation directory where the setup files were extracted in above Step 2)

  15. After CRM 2011 and SSRS Connector installation is completed. Install the UR 13 for CRM 2011 Server as well as SSRS Connector downloaded above in Step 1 (4)

This concludes the CRM 2011 installation on Windows Server 2012.

Kindly provide your valuable comments, suggestions or any issue you face while installing CRM 2011.

Thank You!!! J

Wednesday, October 26, 2011

Add a button to MS CRM 2011 Form Header

Hi,

Few days back I had a request to have a button in CRM Form Header. I wondered about the request and started working on its feasibility study. While searching and googling around I found this link which described about adding a button to CRM Form. I took this post as a help and started working on the same, as CRM header fields are not available to us during form onload event. I had to change some of the scripts to make it available for Header. Find below script for the same.

Solution:
1. Create a new text field on CRM 2011 form (type: Multiple Lines of Text).
2. Add the new text field in the Form Header.
3. Add below script function to Form OnLoad event.

function ConvertHeaderFieldToButton(fieldname, buttontext, buttonwidth, clickevent, title)
{
//check if object exists; else return
if (document.getElementById('header_'+fieldname+'_d') == null)
{
 return;
}

var divField = document.getElementById('header_'+fieldname+'_d').all[0];

var btnField = document.createElement("button");

btnField.setAttribute('type','button');
btnField.setAttribute('name',buttontext);
btnField.setAttribute('readonly','readonly');

btnField.style.borderRight="#3366cc 1px solid";
btnField.style.paddingRight="5px";
btnField.style.borderTop="#3366cc 1px solid";
btnField.style.paddingLeft="5px";
btnField.style.fontSize="11px";
btnField.style.backgroundImage="url(/_imgs/btn_rest.gif)";
btnField.style.borderLeft="#3366cc 1px solid";
btnField.style.width=buttonwidth;
btnField.style.cursor="hand";
btnField.style.lineHeight="18px";
btnField.style.borderBottom="#3366cc 1px solid";
btnField.style.backgroundRepeat="repeat-x";
btnField.style.fontFamily="Tahoma";
btnField.style.height="20px";
btnField.style.backgroundColor="#cee7ff";
btnField.style.textAlign="center";
btnField.style.overflow="hidden";
btnField.style.lineHeight="14px";
btnField.title=title;

btnField.attachEvent("onmousedown",push_button);
btnField.attachEvent("onmouseup",release_button);

//add your if condition for respective buttons' click event
if (clickevent == ButtonOnClick)
btnField.attachEvent("onclick",ButtonOnClick);

if (document.getElementById('header_'+fieldname+'_c') != null)
    document.getElementById('header_'+fieldname+'_c').style.visibility = 'hidden';

btnField.appendChild(document.createTextNode(buttontext));

divField = divField.appendChild(btnField);

window.focus();

function push_button()
{
window.event.srcElement.style.borderWidth="2px";
window.event.srcElement.style.borderStyle="groove ridge ridge groove";
window.event.srcElement.style.borderColor="#3366cc #4080f0 #4080f0 #3366cc";
}

function release_button()
{
window.event.srcElement.style.border="1px solid #3366cc";
}

// add a function to call for each button added to header
// definition of the function to call on button click
function ButtonOnClick()
{
alert('Button Click');
}
}

And you are done with your task of adding a button to CRM Form Header.

Hope you find this post helpful for your relevant task.
Feel free to post the query in case you need any aid for Dynamics CRM and this post.

Thanks !!! J